After the initial installation, the model will be configured to run the example case discussed in more detail below. The "Quick Start" menu tab can be used to run the example or the previous simulation in one-step. For more detailed simulation configurations, follow the steps below.
The easiest way to run the model is to use the GUI menu to create the model's input CONTROL file. For the purposes of this demonstration appropriate meteorological files are provided. If for some reason the menu system is not available, perhaps because Tcl/Tk was not installed, the Control file can be created manually
Step 1 - start the GUI menu system using \working\hysplit.tcl or the desktop shortcut to Hysplit. A widget will appear with the HYSPLIT graphic and three button options: Menu, Help and Exit.Click on Menu tab.
Step 2 - The four main menus of the Hysplit GUI will appear: Meteorology, Trajectory, Concentration, and Advanced. An additional small widget underneath the main menu gives the current Hysplit version information. Do not delete this widget as it will terminate the GUI. It provides the reference frame for the model's standard output and messages. Click on the Trajectory tab.
Step 3 - Five options appear under this item: Setup Run, Run Model, Display, Utilities, and Special Runs. Normally these are run in sequence, however any item can be selected and run if the appropriate input files were created during a previous simulation. Click on the Setup tab.
Step 4 - Setup Run is used to enter the basic model simulation parameters: the starting time of the calculation; starting location in terms of latitude, longitude, and height; the run-time or duration of the trajectory calculation; and the names and locations of all required files. When modifications to this menu are complete, click on Save. However for this example, you will use the Retrieve option for predefined configurations, so do nothing here and go on to Step 5.
Step 5 - The example calculation is configured by clicking on Retrieve and then entering the text: sample_traj, which is the name of the example simulation control file that was created for this demonstration. Then click on OK. After the data entry widget is closed, click on Save and the setup menu will close.
Step 6 - Click on Run Model, which first copies the setup configuration (default_traj) saved in the previous step, to the model's input CONTROL file. The model calculation is then started. A series of messages will appear on standard output text window showing the progress of the calculation. When the simulation is completed, the trajectory end-points output file is ready to be converted for graphical display. Under some operating systems, the standard output widget will not show any output until the end of the calculation and the Trajectory menu items will be locked until the calculation completes.
After completion click on Exit to close the window.
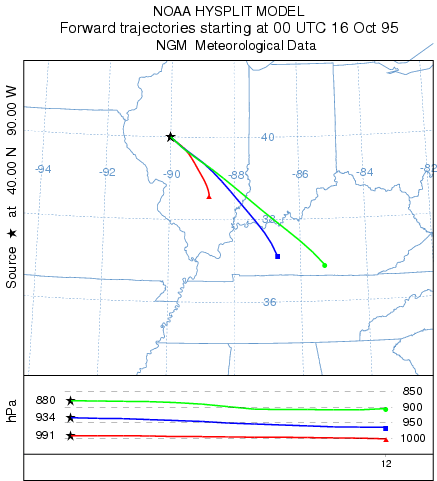
Step 7 - Selecting Display will run a special program that converts the text file of trajectory end-point positions into a high quality SVG file (trajplot.html) suitable for printing. The conversion widget provides options for the frequency of the labels on the trajectory, a variable zoom factor, and color or black and white graphics options. If a web browser has been installed and associated with the .html file suffix, then it will be invoked by the GUI. If the web browser does not automatically open, it may be necessary to manually edit ../guicode/hysplit.tcl to change the directory location associated with the web browser program. After clicking on Execute Display, the following graphic will appear in the web browser window: