The Special simulations menu tab is required because certain options may require a different executable file, modifications to the Control file that are not supported by the GUI, or interactions with other items under the Advanced Menu tab. More information is provided below for each special simulation. Some Special Simulations may not be available for all operating systems.
This menu calls a program called HYSPTEST, which is a simplified version of HYSPLIT that will read the various input files such as CONTROL and SETUP.CFG to determine if many of the user options are correctly or optimally configured. The program opens all the meteorological data files. No output files are created except MESSAGE and WARNING files. Both trajectory and dispersion input files can be read, however only limited testing is conducted with a trajectory calculation. Standard analysis messages are written to MESSAGE_mod. When CONTROL file or SETUP.CFG file changes are suggested, these changes will be summarized to the file WARNING_mod. The modified (or unmodified) input files are written to CONTROL_mod and SETUP_mod.CFG. The suggested changes can be loaded back into the GUI variables by retrieving CONTROL_mod and SETUP_mod.CFG into their respective menus.
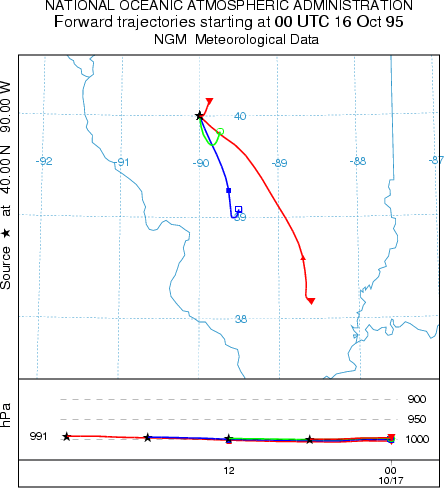
The ensemble form of the model automatically starts multiple trajectories from the selected starting point. Each member of the trajectory ensemble is calculated by offsetting the meteorological data by a fixed grid factor as defined in the Advanced Trajectory Configuration tab. The default offset is one meteorological grid point in the horizontal and 0.01 sigma units in the vertical. This results in 27 members for all-possible offsets in X, Y, and Z. After the model calculation has completed, use the normal Trajectory Display tab to view the results. Because the offset is computed in both directions in the vertical from the starting location, a starting location at the ground would not provide an optimal configuration for this type of simulation. The default vertical offset is about 250 m. Therefore this should be the minimum starting height for ensemble trajectories, unless the default offset is changed in the namelist file. An example of the ensemble trajectory using the example meteorological data is shown in the illustration below.
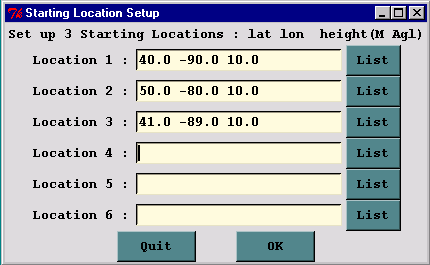
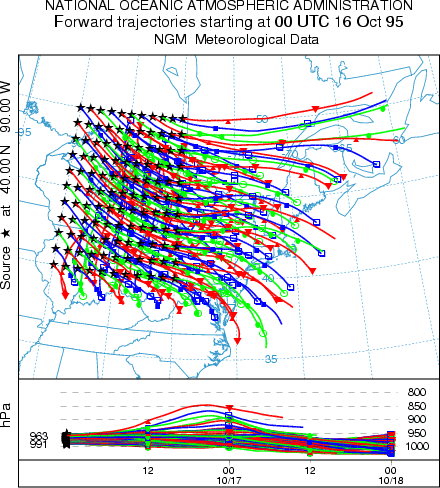
The matrix calculation is a way to set up the CONTROL file for multiple starting locations that may exceed the GUI limit of 6 under the Trajectory Setup tab. Hundreds or thousands of starting points may be specified. The Run Matrix tab just executes the model using a CONTROL file that is dynamically created from the default_traj file using a special program called latlon that is called from within the GUI. The program reads a CONTROL file that is required to have three starting locations and then re-writes the same file with multiple locations. The multiple starting locations are computed by the latlon program based upon the number of starting points that fall in the domain between starting point 1 and starting point 2. Each new location is offset by an amount equal to the difference between starting locations 1 and 3. An example would be more illustrative. If the original control file has three starting locations: #1 at 40N, 90W, #2 at 50N, 80W, and #3 at 41N, 89W; then the matrix processing results in a CONTROL file with 121 starting locations, all one degree apart, all between 40N 90W and 50N 80W.
The reason for this approach is that only the CONTROL file is modified and not default_traj. The GUI never reads CONTROL, therefore the file does not need to conform to the GUI limits. The final matrix trajectory using the example meteorological data for this configuration is shown in the illustration below.
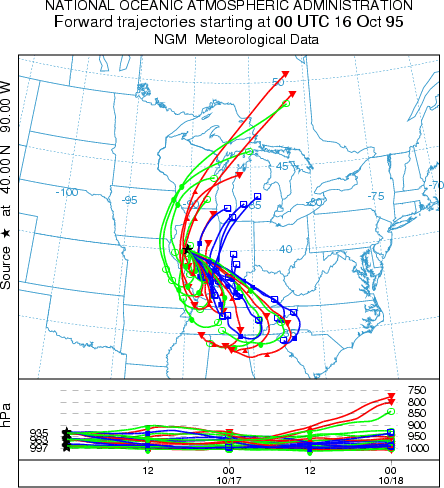
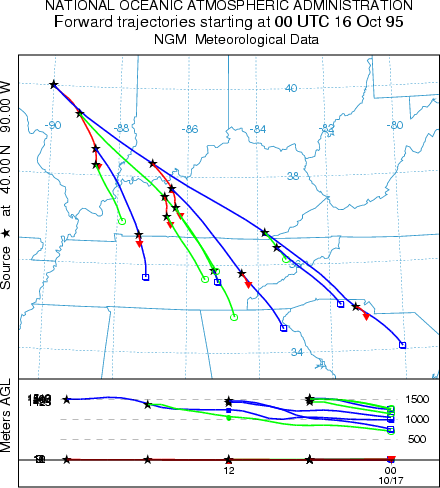
In the normal simulation configuration, all trajectories start at time that was defined in the first line of the Trajectory Setup menu. Trajectories starting at a different time would require an independent simulation. However, there is shortcut to permit the calculation of multiple trajectories in time from the same starting location. Setup the simulation for a single trajectory then go to the Advanced Trajectory configuration menu. Under the Temporal Trajectory Restart line, edit the temporal interval in hours from the default of zero (no restarts) to the desired value. For example, if this value is set to 6 hours (corresponding to NSTR=6 in the namelist file SETUP.CFG), then in addition to the normal trajectory that starts at the initial time, new trajectories would be started every six hours for the duration of the simulation. The result of this simulation, using the example meteorological data, is shown in the illustration below.
Multiple Trajectories in Space and Time
The standard setup options of the GUI permit the calculation of multiple trajectories in space or height by simply specifying new locations in the CONTROL file. A variation of that procedure was shown above with respect to setting up a matrix of starting locations. The model also permits the start of new trajectories at different locations along an existing trajectory. This can be considered a special case of multiple trajectories-in-time because when starting a new trajectory along an existing trajectory, the new starting location differs in time and space from the original trajectory. In this variation, new trajectories are started at multiple levels at the temporal restart interval. The multiple restart levels are assumed to be the same multiple starting heights specified in the original setup and therefore the number of restart heights must equal the number of starting locations. Go the Advanced Configuration menu and setup the example as in the previous case to restart trajectories every 6 hours. Then change the Number of Levels parameter from its default value of zero (no new trajectories) to the number of new trajectories will be started. For example, set the number of levels to 2 (sets the NVER=2 parameter in the SETUP.CFG namelist file). The number of starting locations should also be set to two, at the same location, but with release heights of 10 and 1500 m. Two trajectories, at 10 and 1500 m, will start every 6 hours. The result is shown in the illustration below.
Daily
Another way to generate multiple trajectories in time is to use the automated daily trajectory menu option to create an endpoints file for each starting time. This differs from the previous approach where all trajectory endpoints were written to one output file. Using this menu the model is executed in a script with a unique output file name for each simulation. This method is required for trajectory clustering.
Clustering
Multiple trajectories may be aggregated into groups to minimize the difference between trajectories in that group using clustering methods. The use of the clustering program requires one endpoints file for each trajectory. Normally a minimum of 30 trajectories is recommended for clustering.
Geo-Location
Multiple trajectories can be run from sampling data to determine the highest frequency of upwind directions associated with the non-zero measurements. The geo-location menu automatically configures the trajectory control file and runs the model based upon a data file of measured values such that a trajectory is started from each location every hour that there is a non-zero measurement.